NON-METALLIC METAL STEEL PAINTING GUIDE: Zondnautica

NNM Steel Painting Guide
So I'm a bit of a beginner when it comes to non-metallic metal painting. However, I wanted to give it a shot on my Infinity minis and I started practicing the technique on my JSA models about three years ago (wow three years into Infinity now!). In the past, working on GW models, I preferred to paint metallic metals, however the techniques are fairly similar. If you paint steel, you only have to replace the metallic silver paints with greys and in both techniques white and black are used as extreme highlights and shadows. One thing I did improve upon over the past was thinking about a light source and how it hits a surface and I tend to think about this more when painting NNM metallic parts.Although I don't consider myself an expert on NNM technique, I have gained some mastery in the last three years and I decided to put together a tutorial to share my experience, largely because Oni on the CB Infinity forum asked me how to do it. Apologies Oni for the late response! The subject of the tutorial will be applying NNM to the steel parts in seven stages to the Zondnautica motorbike.
I used Vallejo Model Colour paint,
including from dark to light:
- Black
- Dark Grey
- Neutral Grey
- Dark Sea Grey
- Sky Grey
- Cold White
Stage 1 and 2: Base Colour and Shading

When I paint a miniature I usually break
it up into sections after applying the main base colours. After that I work on different colour sections. On the Zondnautica bike above I’m now ready
to work on the metal parts. For the tutorial I will focus primarily circle in
the middle and the exhaust grill underneath it so I can talk about the way that
light will hit different surfaces. But will compare this section to other parts
from time to time.
First I painted a base colour of Neutral Grey as neatly as possible using
a couple of thinned down coats to get an even coverage of all the metal areas.
Then I washed Dark Grey over the
shadowed areas and it at is this stage where I start to sketch where a light source
will hit the model, in this case from the top of the model.
On a flat surface that is vertical
the shading will go on the face of the surface toward the top of the object and
lighter colour will be applied to the bottom.
So on the circled section the Dark Grey is applied more to the top of
the circle and wet blended towards the bottom. You can see this more clearly at
this stage on the square boxes on the left.
For a curved surface the shading will
be applied more to the bottom of the object than the top, and lighter colour
will be applied to the top. So on the exhaust
Dark Grey is applied to the bottom
and wet blended up the object. You can see this more clearly at this stage on
the wheel on the left.
The top of surfaces have no shading
at all, whilst the bottom are completely shaded.
On the circle you can see the lightness of the base colour clearly in
the picture but the shading is out of view (it is however applied as
described).
Stage 3: Shading

At this stage I simply added a Black wash to any lines or holes. On the circle, the wash is traced around the
whole outer circle and around the bottom of the inner circle also. The holes in
the exhaust are also filled in.
Stage 4: Blend Base Colour

At this stage I reapplied the Neutral Grey base colour and started to neaten
things up. You can clearly see the circle
and exhaust take on a more defined shape. I wet blended the base colour to the
bottom of the circle face surface and did the same to the top of the exhaust
curving down. I then applied a neat base
colour edge highlight to all edges of the objects. Finally, you can see the
base colour applied to the top half of the inner circle that is diagonally
sloped, whilst at the bottom it is only applied to the edges.
Stage 5: Highlight 1

I used Dark Sea Grey as the first main highlight. It is mostly only
applied to the top surfaces where light would hit the objects. On the circle it clearly seen on the top half
of the edges but a little was also applied to the bottom of the edge of front
flat face of the middle circle. I also
applied a slight stippling of this colour to the lower part of the circle face.
On the exhaust, the highlight was
applied to the top edge of the whole object but you will see it applied to the
bottom edge of the exhaust holes. Light
stippling was applied to the top part of the surface face.
As an aside, I also blended the
base coat of Neutral Grey on other areas using the techniques described above. However you can see the difference the highlight makes compared to the base colour.

This pic shows the Dark Sea Grey highlight applied to all
the metal parts. What is clearer to see on
the wheel on the left are stippling effects applied to the middle of flat
surfaces to emulate how light reflects off burnished steel.
Stage 6: Highlight 2

A second highlight of Sky Grey was
applied only to about 50% of the very top edges to the same areas described in
the last stage. You can see this makes quite
a difference on the circle and exhaust and makes them pop compared to the other
steel parts.

In this pic all the steel parts
have had the second highlight applied.
Stage 7: Spot Highlights

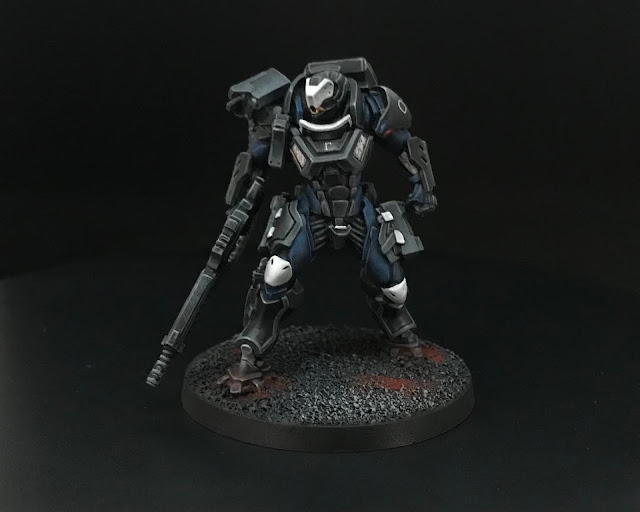
A pure spot of Cold White is applied here and there to corners and to the middle of some curved edges to indicate pure light reflecting off the metal. The spots are applied mostly to top edges but not exclusively. The spot highlights are a bit hard to see in this pic, but in the finished pic below you can see them quite clearly.
Completed Miniature

Hope you enjoyed this guide and
found it useful. The full gallery of the
completed Zondnautica can be view here.


Nice articles and your information valuable and good articles thank for the sharing information metal wheel guides
ReplyDelete